Posts in the Social Networking category are related to social networks such as Facebook, Twitter, Instagram, and others.

how to leave facebook the right way featured image

5 Steps to Leave Facebook the Right Way

I hate Facebook. No, that’s a lie. I have a love/hate relationship with Facebook, and both emotions have the power to keep me unintentionally captivated by the nonsense going on in my feed. One thing I know for sure is that I have to leave Facebook.

A friend mentioned a few weeks ago that she was quitting social media to make her communication more intentional.

Intentional communication.

What a concept. Her words struck a chord with me and ever since I’ve been experimenting with ways to solve my Facebook addiction.

I’m a web marketer. How the Hell can I quit social media?

Here’s how. I need a Facebook account to access pages that I manage. That’s unavoidable. But I want to separate myself from the day-to-day drama of social media. So I’ve developed a few simple steps to help you wipe your account’s information, and the ability to communicate with you through Facebook, while still retaining your ability to log in and manage pages.

Step 1: Back up your Profile Data

Inevitably you’ll want to contact someone you were friends with on Facebook, or you’ll want to reference some long-forgotten post or message. Facebook offers a way to download a backup of your Facebook profile. Click here to learn how to backup your profile. This operation will generate a ZIP file with your Facebook history, Facebook contacts, and more. Is it in a useful format? Eh. Not really. Most of the information comes in an HTML file. You can open in a web browser and manually copy/paste what you need.

how to download your facebook data

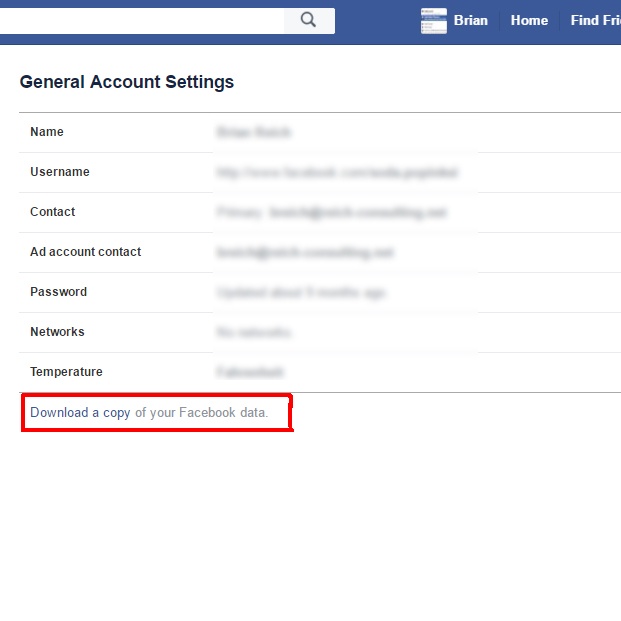
Leave Facebook Step 1: Go to your General Account Settings and click “Download a copy of your Facebook data.”

Step 2: Delete Your Facebook Activity

It’s a well-established fact that deactivating your Facebook profile doesn’t delete anything. And remember: I need my account active, so deactivating or deleting my account aren’t good options anyway. But I want to be able to

  • Remove my relationship with all of my friends.
  • Remove as much of my Facebook history as possible so my kids can’t find evidence of what an ass their dad was.

Fortunately, a smart programmer has found a way!

Install Google Chrome if it’s not already your browser of choice, and then install the F___book Post Manager Chrome plugin. Log in to your Facebook account and navigate to your Activity Feed. Open the plugin and configure it to delete the posts you want to be removed. A word of caution: this operation is aggressive. And it’s buggy. You’ll need to run the plugin several times to remove all your activity. Some activity, such as posts by friends you’re tagged in, just can’t be deleted.

Use the F___book Post Manager plugin to delete your activity

Leave Facebook Step 2: Use the F___book Post Manager plugin to delete your activity

Step 3: Unfriend Everyone

Deleting your friends is the emotionally challenging but most meaningful part of the process. You need to say goodbye to all of your Facebook friends. Why? Because bad associations are a big reason why Facebook sucks. That may be a generalization, but it was certainly true for me. Facebook was a negative influence on my life for three reasons I can identify:

  • My friendships were based on real-world associations, friendships, and family ties. Those relationships didn’t translate well into the digital space.
  • Facebook seems to show content based on it’s potential to keep you on Facebook, not on value to the viewer. Ad revenue powers the Internet. And ads are driven by session duration (engagement). If you’re interested in this topic, listen to Sam Harris’ conversation with design ethicist Tristan Harris. It’ll make you want to punch the Internet in its greedy face.
  • My behavior. I had this idea that people can and should have reasonable conversations about ideas. I would posts questions or facts and try to start a polite discussion. My network of friends would prove me wrong about their ability to discuss ideas like grown-ups and damage my respect for them a little each time. In the end, I had to admit that I could accomplish nothing positive. I was just an accidental troll.

The best resolution for me was to unfriend everybody. Nobody can be mad if you’re treating them the same way you treat your mother, right?

It’s easy. Go to your profile and click the Friends tab. Go through your list and click “Unfriend” to everyone on the list. Depending on the number of associations you have this could take a while, and I didn’t find a faster way to do it.

How To Unfriend your Facebook Friends

Leave Facebook Step 3: Go to your profile and click the Friends tab. Then click “Unfriend” for everybody.

Step 4: Update Your Security and Privacy Settings

Now your Facebook profile has no history and no relationships. How do you keep it that way? You lock down your profile. Go to your Facebook settings and, for once in your sad online life, make use Privacy tab. Here are the settings that I have configured to limit communication and friend requests going forward:

  • Who can see my stuff? Friends (which is nobody) You can also restrict the audience on old posts since there is probably some content that was not deleted by Step 2.
  • Who can contact me? Friends of friends (which is nobody)
  • Who can look me up? Friends (for all settings)
A screenshot of my Facebook privacy settings, configured to allow minimal contact.

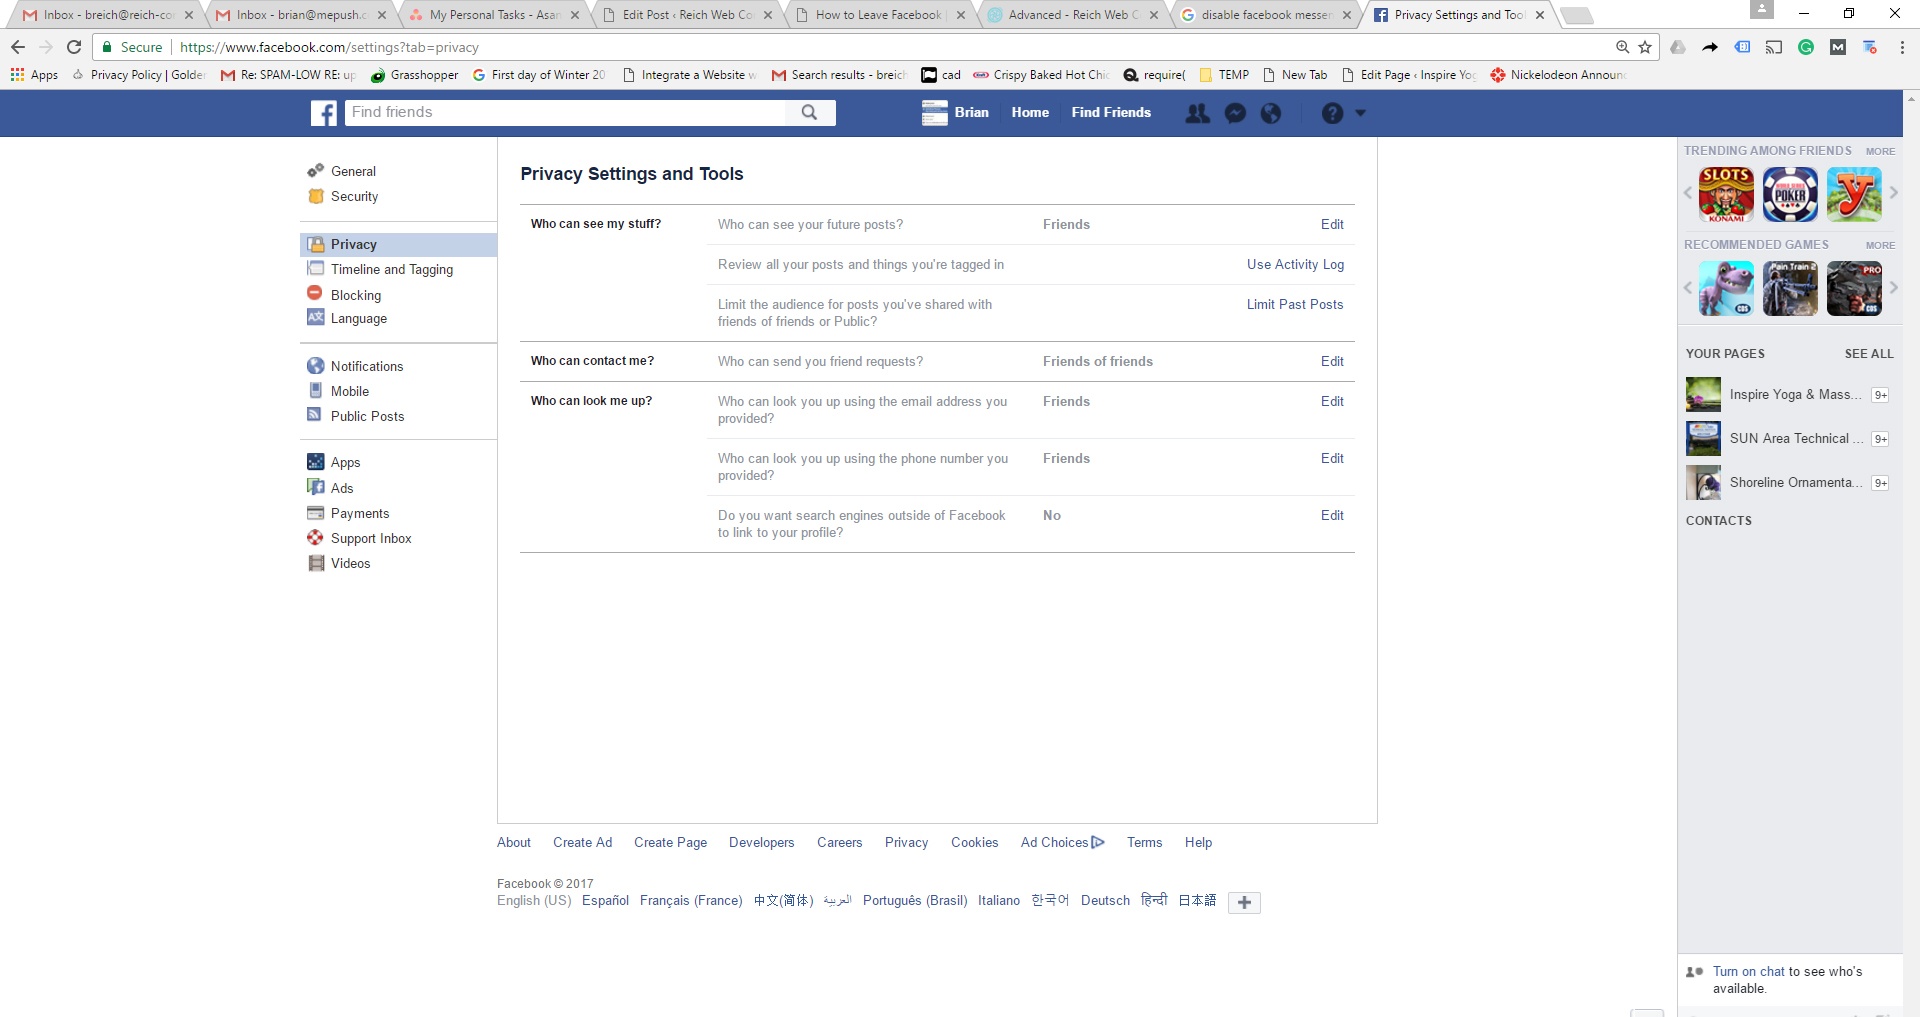
Leave Facebook Step 4: Facebook privacy settings for minimal contact.

Step 5: A Final, Public Post

This last step is optional but recommended. Write a final post on your Facebook profile that lets people know that you’re no longer using Facebook, you will not see or respond to their messages, and how they can contact you going forward. Here’s what I wrote:

Looking for Brian? He’s not here anymore. This Facebook account only exists so I can log in and manage my clients. DO NOT POST. DO NOT MESSAGE ME. I will not see it.
If you need to contact me, for business or personal reasons, go to my business page and find my contact info.

Conclusion

As of this moment I’ve been off of Facebook for two weeks. I feel good. I feel happier than I did when I was using Facebook. And I feel more productive. I never bothered to measure the amount of time I spend on Facebook, but it had to average out to 1-2 hours a day. That’s a lot of wasted time, especially to a person whose self-employed.

Leaving Facebook was the right choice for me. And leaving it intelligently by deleting my data trail, removing my associations, and leaving my account intact makes sense for me and my career. But of course, your needs and mileage may vary.

Do you suffer from social media fatigue like me?  Do you have a different way of dealing with it?  Let me know! Leave a comment below.  I’d love to hear your thoughts.

2016-08-31 How to Take Your Life Back From Social Media Featured Image

How to Take Your Life Back from Social Media

Everything wants your attention and almost nothing deserves it. There are moments when the noise generated by the Internet seems to drown out the things that matter.

Count how many notifications your phone generates in an hour. How many of those distractions really deserved your attention? On my average day, I’d say somewhere close to zero.

Our modern mobile obsession didn’t bother me until recently. I figured it’s a social change and that we’ll adapt to it in time. But as I struggled to meet a deadline I realized the speed of Darwinian evolution wasn’t going to fly for me.  Five different social networks screamed for attention as dozens of blogs were actively nagging me with Push Notifications to read new posts.

Each time something tugs at our attention, it takes time to get it back. Some studies show it can take over 20 minutes.  Reading a new comment on Facebook only takes a minute, but getting your brain back into the task you just abandoned could take longer.

Whether you’re self-employed like me or you work for somebody else, your time is money to somebody. And more importantly, your time is your time. Take control of it.

I don’t suggest you stop using smart phones or social media.  I love this stuff. I’m suggesting you use technology intelligently to make it your bitch and not the other way around.

Disable Unnecessary Phone Notifications

I’ll cut to the chase: here are instructions on how to disable notifications on the two major types of smart phones, iPhone and Android:

If you have a smart phone turn off notifications from apps that aren’t that important. For me this included Facebook, Instagram, Twitter, LinkedIn, shopping apps, news apps, and others. If anyone expects you to be instantly available through any of these apps (looking at you, mom!) realign their expectations and suggest contacting you a different way if they really need your attention.

You won’t lose notifications: most apps just present them the next time you open the app.  Disabling app notifications ensures that you see them on your schedule and not when the app wants your attention.

Social networks and app developers know that once they have your attention, you’ll likely waste a few minutes scrolling through your feed, reading junk, and generating ad revenue. Your wasted time equals their money. Don’t play their game.

This simple step has simplified my life considerably. Disabling phone notifications has improved my productivity, and when I’m spending time with friends and family I feel more present.  Now I only check my phone when they start to bore me!

Disable Browser Notifications

As if mobile notifications weren’t distracting enough, now the web has push notifications too. While the technology has cool implications for web applications, it’s currently being used to nag users to revisit social media and blogs.

Embrace RSS

RSS is a web format that’s popular among geeks but never caught on among the unclean masses.  Bear in mind: I call you unclean as I sit here typing with orange Cheeto fingers.

Think of RSS as push notifications in reverse. So… pull notifications?  Kind of.

A website’s RSS feed is updated whenever the website has new content to share.  But the website doesn’t blast this information to all of your devices. Instead it quietly updates it’s RSS feed, and it’s up to the user to refresh the feed and see what’s changed.  I use a program called Feedly to view and manage my RSS subscriptions to about 30 blogs. When I open Feedly it provides me with a list of unread articles from all my favorite news sources.

I’m not sure why this model isn’t more popular.  RSS isn’t annoying. It doesn’t beg for your attention. It’s the information you want, when you want it, and not a moment before.

No Self-Control? Lock Yourself Out of Social Media

If you really want to level-up your productivity, install a browser plugin to lock yourself out of time-wasting websites and social media. I use a plugin called StayeFocused to keep me away from Facebook during my office hours.  Of course there’s always a way to circumvent the system, but it prevents turning knee-jerk moments of boredom or frustration into a spiral of pointless scrolling and clicking.

Summary

Nobody is suggesting you give up social media. The productivity suggestions above are deceptively simple, but on average I’d say they’ve saved me an hour every work day. That’s an additional hour of billable time. Or an extra hour to spend with my family, or on hobbies and projects I’d rather be working on. Try it out. If after a week you don’t feel better about life, you can always go back to donating a portion of your day to Mark Zuckerberg.

How to Add Social Media Icons to your WordPress Site Featured Image

How to Add Social Icons to Your WordPress Site

One of easiest and most effective ways to integrate your WordPress website into the world of social media is to add links to your social media profiles.  These links help your visitors find and follow your social profiles, and just about every website has them. There are a variety of ways to integrate social links or social icons into your WordPress website, and I’ll demonstate three methods in this article.

1. Choose a Theme That Supports Social Icons

If you’re in the early stages of developing your website, the simplest way to add icons for your social profiles to WordPress is to choose a theme that provides social links as a feature. Lots of themes have built in support for social media icons. All of my favorite premium themes support them including the theme I’m currently using on this site (Enfold). Lots of free themes in the WordPress Theme Directory support social icon, and even WordPress’ current default theme Twenty Sixteen has a social icon menu built in.

There are few things to keep in mind:

  • There are better reasons to choose a WordPress theme, and there are other ways to add social media icons. So if you’ve chosen a theme but it doesn’t support social media icons, you don’t necessarily need to discard it for that reason.
  • Make sure the theme supports all of your social media profiles, or provides a way to add new ones. I recently built a website for a well-known romance author and she needed an icon for Goodreads, a niche social network for authors and their fans. My theme didn’t support it directly but made it easy to add a new social network and icon.
Highlighted in this image is the social icon area built into Enfold, one of my favorite premium themes.

Highlighted in this image is the social icon area built into Enfold, one of my favorite premium themes.

2. Use a Plugin to Add Social Icon Support

You can use a plugin to add social icons to your website. Some plugins, like Social Icons, work by letting you manage a list of your social media profiles and then  the plugin displays the icons as a widget in one of your WordPress widget areas. Some like cbnet Social Menu use WordPress’ menu tool to manage your social icons. Choose a plugin wisely: make sure it has a high rating and good reputation, and that it’s author updates it regularly.

In this screenshot I've highlight the social icons that have been inserted with a plugin.

In this screenshot I’ve highlight the social icons that have been inserted with a plugin.

3. Manually Add Social Icon Support

If you’re not afraid of writing some code, adding your social icons to your WordPress theme is easy. You need to choose where in your theme you want to add the icons, insert some HTML code, and then add some styling to your theme’s style.css.  Here’s some sample code. Obviously your code will differ base on your theme and how you want to style your icons.

HTML Code

Add the following HTML to your theme to render a list of social icons. You could place this anywhere, but you’ll usually want your icons to appear in your header (header.php) or footer (footer.php):

<ul class="social-icons"> <li><a href="https://www.facebook.com/user"><em class="fa fa-facebook-square"></em></a></li> <li><a href="https://www.twitter.com/user"><em class="fa fa-twitter-square"></em></a></li> </ul>

CSS Code

Add the following CSS code to your theme’s style.css to style the list as a horizontal list of icons. You’ll need to modify the code to integrate the look and feel of the icons into your own theme.

/** * Load FontAwesome if your theme isn't already doing it. */ @import url(https://maxcdn.bootstrapcdn.com/font-awesome/4.6.3/css/font-awesome.min.css); /** * Style and position the list. */ .social-icons { top: 0; right: 0; margin: 0; padding: 0; list-style: none; text-align: right; margin: 10px auto; max-width: 1174px; } /** * Style the list items. */ .social-icons li { padding: 0; display: inline-block; font-size: 30px; } /** * Override the colors of the FontAwesome icons to be appropriate for the * social network. */ .social-icons li .fa-facebook-square { color: #3e5b98; } .social-icons li .fa-twitter-square { color: #4da7de; }
In this image I've highlighted the social icons that I manually added to my theme code.

In this image I’ve highlighted the social icons that I manually added to my theme code.

Summary

There are a number of ways to easily add social media links and icons to your WordPress website using themes, plugins, and custom code.  But adding links to your social media profiles are just one way to integrate your website with social media! Stay tuned for more tutorials on integrating your WordPress website with social media.

How to Post to Instagram from a PC

Instagram is a great social network for your everyday user. But it’s clearly designed around a mobile experience. If you go to the Instagram website on a PC and log in, you’ll notice it’s essentially a read-only experience. You can’t upload, which is really annoying for those of us who want to polish our images in Photoshop or Lightroom before we share them. So today I’m going to show you how to post to Instagram from a PC.

How to Post to Instagram from a PC Using Gramblr

To post to Instagram from a PC we can use a free tool called Gramblr. Go to gramblr.com, and click the button for your platform. Gramblr downloads as a ZIP file, so go ahead and right-click and choose Extract All to extract the ZIP file.

Now you can open Gramblr. Enter the folder that was extracted by the ZIP file, and double-click gramblr.exe.

Windows Security Warnings

If Windows warns you about running the program, go ahead and allow it. As of the recording of this video, Grambler is a pretty safe download.

Create a Gramblr Account

When you first open Grambler, you’ll need to create a Grambler account. Go ahead and enter your email address and a secure password. You’ll also need to enter your Instagram username and password. Once you’ve done that go ahead and click Sign Up.  I already have a Grambler account, so I’ll click Log in now, and then enter my username and password.

Upload Your Image

Grambler has a ton of features, but for this video all we really care about is the upload feature. If you’re not already on it, click the Upload Now! tab. You can either drag a file onto the upload area, or click the Upload area and then select your file. Go ahead and move your image or video to the upload area.

Crop Your Image

Grambler gives you an opportunity to crop your image before you upload it. Click Save if you’re happy with your image as-is, or click and drag on the image to add crop marks. You can limit cropping to a particular scale by choosing the 4:3 or 1:1 scale buttons. When you’re satisfied, click Save.

Apply Filters

Just like Instagram on  your phone, Gramblr gives you the chance to apply filters to your images before you upload. Go ahead and explore the filters and motions buttons, and click Continue when you’re happy with your image.

Post or Schedule

Finally, Gramblr lets you write a caption and apply hashtags. At this point I like to go to the Instagram homepage and do searches to explore hashtags that might be popular for my image. Once I’ve added the caption and hashtags, I can choose to upload immediately, or schedule the post for another time. This is a really useful feature for folks that want who have a ton of photos to upload, but don’t want to bombard their audience all at once. Go ahead and click Send.  When  you do your image will either get posted immediately to Instagram, or wait to be posted at the scheduled time.