My Experience with Yelp Paid Advertising

Updated May 1, 2017. The emails just keep rolling in from others who feel as if they were scammed into Yelp paid advertising. At the end of the post Jim from  Panoptic Media shares his experience with Yelp.

This post describes my experience with Yelp paid advertising from the moment I took the sales call to today, about one month from the end of my sixth month contract. If this post disappears it’s because it violated some esoteric clause in the contract. Otherwise, this is my experience with the service as honestly as I can describe it.

My Experience with Yelp’s Sales Team

I need only three words to describe Yelp’s sales tactics: polite, premature, and annoyingly persistent. Okay, that’s four words.

A representative from Yelp left me several voicemail messages in February. I ignored them. But eventually their persistence paid off and I decided it couldn’t hurt to see what they had to offer. My business is new and I’ve had a difficult time getting out in front of my more established competition. So the next time Yelp called I answered.

The Yelp salesperson was friendly. She explained the package she wanted to sell me in clear terms. The most enticing aspect of paying for ads on Yelp is that they’ll place your ad on your competition’s Yelp page. That means that when potential customers see your local competition’s profile they’ll see your ad too. A little shady? Sure. But it’s a pretty compelling feature to a new business like mine that’s fighting tooth and nail for recognition.

Yelp’s Advertising Package

The advertising package basically sold itself. Until she told me the price and the terms. Yelp charges a flat fee per-month, plus a variable pay-per-click rate. It’s not cheap, and they wanted to sign me up for a 12-month contract. I’m all for investing in my business, but a $6,000 gamble? I wasn’t ready for that.

I told them no. It was too expensive and too much of an unknown. The sales person pushed. We played the “How Much is a New Client Worth to You?” game, and after several innings I lost. Her insistence and my naiveté about Yelp won.

I negotiated the cost down with fewer features and a 6 month contract. My sales package included ads that would be seen on competitive Yelp pages for six months, and a $150 CTM budget. I could configure ads for desktop and for mobile.  I dropped the expensive video service that they originally included in their quote and that reduced my cost significantly. For me the advertising package was still insanely expensive but it was a cost I could live with losing if it didn’t pan out.

So far it hasn’t.

I’m at the end of my six-month contract and I won’t renew it. Let me break down the reasons why.

Yelp Paid Ads are Expensive

As I said, Yelp’s paid placement isn’t cheap. While I did negotiate a better price than I was initially quoted, by the time my six month contract expires my experiment with Yelp will have cost me around $1,000.  $50 in highly targeted Facebook ads and $100 in AdWords spend have been far more effective.

My Ads Have Performed Poorly

I’ve got some experience with Google AdWords and I understand that it can take a month or so to optimize your ads and start getting more and higher quality conversions.  I will say that Yelp worked with me and provided some advice on optimizing my profile.  But the conversions never came.

In 6 months time I’ve had around 60 views to my Yelp profile. In this time Yelp reports that it has generated 6 calls to my business, 6 clicks to my website, and 2 clicks to the Calls to Action on my ads.

Keep in mind that these numbers are not broken down based on whether they came from an ad or organic Yelp traffic. The only two clicks that I know were ad traffic are the clicks to the ad CTA’s.

But it doesn’t matter where the clicks came from. Of the $1,000 I’ve spent and the 14 clicks that I’ve received, no one has converted to a paying customer.

I can’t blame Yelp completely. Maybe those 6 clicks to my website bounced because my website is awful or something. Or maybe they just didn’t find what they needed fast enough.  But I can blame Yelp for the phone calls.

All the Phone Calls Generated by Yelp Were Unsolicited Sales Calls

Of the six phone calls Yelp has generated for my business all of them have been sales calls. How can I tell? It’s easy.  Yelp records the date and time when a click-to-call event occurs.  By comparing this to the log in my phone, I know exactly what call that click generated.

Every single call Yelp generated was another business calling me to sell me services. That’s annoying.  But when you consider the fact that I’m paying a CPC rate for those calls when they arrive through my ads, it’s downright infuriating.

Yelp Isn’t Popular in my Area

Yelp isn’t popular in my area. I thought I did my due diligence before purchasing by studying the profiles of my nearest competition. I saw that they had a few reviews and good ratings, but I didn’t see that their handful of reviews spanned over 5 years. Yelp just simply hasn’t been tapped as a resource in central Pennsylvania.  Given that there just isn’t anyone using Yelp in my area, how could I have any expectation of success with Yelp paid advertising?

I guess I can’t blame Yelp completely. It’s a sin of omission on their part.  But I do feel like they sold me an ad package they should have known would not perform well.

I Have Had No Yelp Review

I can’t blame Yelp for my lack of reviews. I’m a new business and as I already mentioned Yelp isn’t popular in my geographic area. My client base is small, and Yelp discourages you from asking your customers to leave reviews. Yelp reviews won’t arrive organically as their sales team promised. The one review I received was marked as Not Recommended for who knows what reason.

Update: a reader named Sean pointed out that there is a reason why Yelp! marks some reviews as “not recommended.”  I think at the time I was too angry with Yelp to give them credit for doing anything right, but Sean has a point:

You said that a client left a comment on your Yelp page, but Yelp labeled it as “not recommended”. Yelp does this if the Yelper leaving the comment has only had a very small history of making Yelp comments like three or less. This is so when someone wants to blast a business with negativity but they otherwise have never made a quote on Yelp it just won’t hold up and I noticed that after a year or so they will actually remove those comments. – Sean Denlinger, Reader

The whole point of Yelp is user reviews. When Yelpers Yelp, they’re looking for which business has a high rating with lots of positive reviews. I knew this would be a problem when I signed up, but the salesperson assured me that the reviews would come organically, and in time.  Again I feel like Yelp committed a sin of omission.  They should have had a good idea that I would struggle for success with the ad package they sold me before I had a Yelp history established.

Looking Ahead

As I said: I won’t be renewing my Yelp Paid Ads when my six-month term expires. Yelp proved an expensive gamble.  I bet my money on a horse named Yelp, and she broke her leg exiting the gate.

My failure to see conversions through my paid Yelp ads lies on both our shoulders. I did myself a disservice by failing to research my local Yelp community and activity before I signed the agreement. Yelp’s sales team did me a disservice by selling me a very expensive ad package prematurely. They were privy to all factors working against me and aggressively sold me their advertising package anyway.

If Yelp had suggested ways to bolster my profile, reviews and ratings, they could have sold me a far more robust and successful ad package down the line. Instead they played the short game and we’ve both lost.

How You Can Find Success at Yelp

With all that in mind, there’s no reason to extrapolate my experience and assume it would be representative of your own.  If Yelp is popular in your geographic area then Yelp Paid Ads could increase visibility, and if it’s already highly rated then sending it more traffic via ads will be more effective than sending those clicks to a profile that lacks reviews

My suggestion would be to keep in mind that Yelp’s sales team is pretty aggressive. Friendly, but aggressive. They will have answers to your questions. Those answers will sound compelling. If you say no they will re-frame the problem and restart the conversation. Don’t hit the “Launch” button right away. End the call. Think about it. Do some research and find out if Yelp is popular in your area. See what you can do to enhance your Yelp profile organically before paying for ads. (I have a pinboard setup with some great suggestions.)

If your Yelp profile is already positioned for success through paid advertising, hedge your bets and see if they’ll agree to a short trial period instead of their standard 12-month agreement.

Blog subscribers are beginning to send me their own Yelp horror stories. I think it’s important for anyone interested in this article to understand that my story is far from unique. With that in mind, I’ll be sharing them here.

This was an expensive error that I wish I could tell every business owner I come into contact with about. If I could rate the experience on Yelp, I would give it zero stars. The ad budget that I gave- $450 PER MONTH did not result in ANY increase in business or increase in web traffic to my site. Additionally, $75 additional dollars for an enhanced listing did not improve any incremental traffic to our site. I am now over $1000 in expenses – WITH NO SALES ATTRIBUTABLE TO YELP. (This has been verified via my Google Analytics and Webmaster tools. The Yelp explanation on the sign up page should say “WE WILL BILL THIS AMOUNT MONTHLY NO MATTER WHAT” regarding the monthly budgeted amount- and if Google works differently in the CPC, then Yelp should have made it abundantly clear. If this was coming from a customer of mine regarding my business, this would have appeared on my business’s public review where any potential client could see it. Is there anywhere where I can review YELP! on YELP! so that other businesses could see my displeasure and maybe avoid a $1000 waste of money? Is there anywhere on YELP! where I could lambast Yelp and create pressure for a refund/resolution – the way that Yelp encourages other clients to do to their advertisers? When I called the advertising line to complain, I was told by the representative that I should have used the Managed Advertising Campaign- but that since there was nothing for him to help me with and he transferred me over to another department.The representative in that department, who was very nice and professional, told me that my only recourse is to provide feedback was to send an email. I am frustrated and angry with them. It would be interesting to look on Yelp for an attorney that does class action on contingency.

Vic Levinson

I also got suckered into a YELP campaign that was totally ineffective, in spite of the sales person’s conviction that it would be a boon for my video production business, Panoptic Media. We do corporate and government work, not weddings. We got nothing at all from the very expensive YELP ad. If YELP had a place for it in their universe (which of course they don’t), I’d rate their value to professional services a big zero…

Jim Prues, Panoptic Media

Search Engine Optimization Featured Image

Recovering from a Website Migration Gone Wrong

This is the story of how a budget web design service tanked a small online business with a website migration gone wrong. This customer came to us after the fact for help.  While Reich Web Consulting has had success in helping them recover, their story serves as a cautionary tale for others.

For the sake of privacy we’ve changed the names of everyone involved in this story. I have no desire to publicly shame the company involved in this story even if they deserve it.

What’s a Website Migration

website migration is when a website’s domain name is switched from pointing to one version of a website to another. This can happen when when a website is redesigned on the same platform. A good example would be when a company rebuilds their site with a new WordPress theme.  This can also happen when a website is rebuilt on a new platform. An example would be when moving a website from SquareSpace to WordPress or vice versa.

Migrating a website requires more planning than launching a new website. Since search engines, social media, and other websites already have accumulated links to your site, you have to ensure that those links are not broken in the process. Otherwise the Internet’s collective trust in your site will plummet.

How a Budget Web Design Service Ruined an Online Business

A few months ago I received a call from the owner of Hand-Forged Widgets Inc. (not their real name)The company is a husband & wife team selling some very attractive iron work they make themselves. They had a flourishing store on a platform that had gone stagnant and chose to move their website to a WordPress/WooCommerce solution.  Green Servers (changed for privacy) is a well-known budget hosting company that also offers web design services. Green Servers sold them on a low-cost all-inclusive package. They would host and migrate their content to a new site on WordPress and WooCommerce.

Green Servers delivered on what they promised. But their promise what a ticking time-bomb, and the client was not SEO savvy enough to see it coming.

A Website Migration Gone Wrong

The moment Green Servers updated DNS to point to the new site, Hand-Forged Widgets business flat-lined.  I don’t mean they experienced a small and temporary reduction in sales. I mean orders stopped coming in completely for months.

Hand-Forged widgets found us through our YouTube Channel and decided to give us a call. As soon as I had access to their website and Google Search Console data the problem was obvious: the new website wasn’t redirecting the old URLs. Whomever built the site failed to account for the hundreds of existing URLs.  Every link to every page of their websites that search engines had indexed was now a 404 error. To make matters worse, their website had been switched from http:// to https:// without a proper redirect between them.

Google lost trust. Fast.

The customer was no longer appearing in either organic or paid search results. Google Search Console was full of hundreds of Crawl Errors, and Google’s crawl rate for their site was flat. This suggested that Google no longer found their site valuable enough to crawl and update in their index. And since Google stopped crawling their site, their new URLs would never make it into search results.

A Successful Website Migration Starts with Planning

Green Servers treated the project as a new website. They didn’t apply any of the planning and care required to successfully migrate a website from one platform to another. They made two simple mistakes:

  1. The designer didn’t collect and redirect all the URLs from the old website.
  2. When they switched the site to SSL-only they didn’t setup a redirect from http:// to https://.

Let’s explore these topics in some detail.

Why Redirecting Old URLs Matters

First let’s understand a few important search engine terms: crawl and index.  Search engines crawl websites. This means that the search engine starts with a list of websites, downloads important information from those websites, and follows any links they contain. Wash, rinse, repeat. Search engines keep an index of websites: basically a massive list of links on the Internet. The search engine uses a collection of algorithms to determine when which indexed pages should display in search results for which search terms.

Existing websites have already been indexed by Google. This means that search engines have already compiled a list of pages on your website. If those pages instantly disappear, what do you think will happen?  Google’s algorithm may consider your content unreliable, and your rankings will suffer.

How to Handle Redirects

You can see that it’s critical to maintain the integrity of your URL structure when you migrate a website.  This process doesn’t have to be difficult, and there are two ways to handle it:

  1. When building the new website, take care to maintain your URL structure. Use a tool like Xenu Link Sleuth to compile a list of existing URLs. Compare them to the new site’s URLs before launch and make sure that all existing URLs will still function.
  2. Use a tool like Xenu Link Sleuth to compile a list of existing URLs on the old website. Use this tool to build a list of 301 (Permanant) redirects from old links to the most appropriate pages on the new website. Import this redirect list into your new website.

Green Servers did none of this. As a result Google, Bing, and others essentially saw Hand-Forged Widgets website disappear instantly. A search engine stays successful by offering high-quality links in their search results. If your links are no longer high-quality there is no reason to serve them up.

The Right Way to Handle a Conversion to a Secure URLs

It’s true: Google offers higher ranking for secure websites versus insecure websites. But the switch to https:// needs to be done strategically. If your site will be served completely over HTTPS you should setup a site-wide permanent redirect from the http:// version of your URLs to their https:// equivalent. These redirects keep links intact and tell Google to use the secure version of the URL rather than the insecure version going forward.

So what happens if you neglect to redirect?  Google and other search engines have a concept they call duplicate content. Duplicate content occurs when two web pages contain identical (or very similar) content.  Search engines hate duplicate content, and penalize it. As far as you’re concerned you probably see the http:// and https:// versions of your website as the same thing.  Search Engines do not, and if both are accessible and serving the same content, they’ll see duplicate content.

So when you setup SSL on your website it’s important to handle it correctly in one of the following ways:

  1. Setup a site-wide 301 redirect. Most CMS software makes this easy, either through a configuration option or a plug-in.
  2. Use rel=canonical to tell search engines which version of your URLs are authoritative. Again, most CMS software makes this pretty simple.

Related Side Note: decide on whether you want to standardize on the www or non-www version of your website and make sure that one version 301 redirects to the other. Otherwise you can face duplicate content issues between the two as well.

The key take-away is to make sure that search engines don’t see multiple versions of your content due to lack of planning and bad configuration.

Can These Mistakes Be Fixed?

If your web designer/developer botches your site migration, can the mistakes be rectified?  Of course. In the case of Hand-Forged Widgets I’ve been working with them for two months, and we’ve made significant progress.

The problem is that the damage done by a website migration gone wrong is long-term.  Discovering and repairing the problems using the advice above isn’t particularly complicated. But improving your site’s reputation with a search engine once’s it’s damaged can be slow, and completely at their discretion. Fixing the technical issues that caused Google to lose trust in your website isn’t enough.  You also need to give Google a reason to start trusting your content again, and give it reasons and signals to start crawling your content at regular intervals.

Ways to Suggest to Google to Crawl your Websites

Here are a few ideas on how to jump-start that process.  I owe a thank you go the guys at the SEO 101 podcast  and the SEO 101 Community at Google+ for fielding my question about this. I had already implemented most of their suggestions before the episode aired, but they did confirm my theories on how to convince Google to crawl the customer’s site.

  1. Fix all of the technical issues described above.
  2. Monitor Google Search Console for crawl errors and fix them as-needed.
  3. Submit a sitemap.  If possible, use the sitemap to specify a high crawl frequency to suggest to Google that they should re-crawl your content sooner than later.
  4. Create new, high-quality content.  Creating new content will give Google a reason to crawl your site.
  5. Get active on social media. Start publishing to social media sites and sharing links to your website. Social media activity can suggest to Google that your site is alive, well, and active.
  6. Paid Search. Putting all your eggs in the organic search basket can lead to disaster. Site changes like those that happened to my customer can tank your ranking. And ranking algorithms change.  Website owners can find their Google ranking tanked through inaction. Google changes ranking factors regularly, and rankings can drop when sites fail to accommodate them. Utilizing paid search is a great way to keep steady traffic to your site through those hard times. And successful interactions from paid search visitors can help Google see that your site is, indeed, worthwhile.

The Moral of this Story

This story should help web designers and developers properly plan website migrations.  It should also help business owners know the right questions to ask when they’re hiring a developer or agency to redesign their website or migrate it to a new platform.  These are the key steps to follow:

  1. Ensure that all old URLs are left intact, or that 301 redirects have been correctly implemented to maintain link integrity.
  2. Make sure that multiple versions of your site don’t result in duplicate content problems with search engines.  Ensure that you have a single “canonical” version of your website (either www or non-www) and that the non-canonical version 301 redirects to the other. If you’re switching to SSL-based URLs make sure http:// is 301 redirected to non-http://, or that you’re utilizing rel=canonical to tell Google which site to consider the primary source of your content.
  3. Utilize tools such as Google Webmaster Tools to monitor your website’s health and crawl statistics.
MailChimp Featured Image

How to Use MailChimp RSS-to-Email with WordPress

This post will teach you how to leverage MailChimp RSS-to-Email campaigns to notify subscribers when you update your WordPress blog.

Bloggers depend on a variety of channels to notify their fans when they post new content. This includes RSS feeds, social, and in-browser notifications, and the topic of this post: email subscriptions. Bloggers using the WordPress platform often depend on the Jetpack Subscription plugin to do the heavy lifting. Jetpack leverages WordPress.com to manage lists, construct, and deliver notifications to subscripers. And it works. Kind of. But Jetpack’s Blog Subscription plugin can only take you so far.  It’s insanely rigid, more or less impossible to customize, and really not a great experience for your customers.  It just doesn’t feel like a professional solution.  So what does?  Try using MailChimps RSS-to-Email feature. All you need is an active MailChimp account and the ability to make some minor changes to your WordPress site.

How to Integrate MailChimp RSS-to-Email with WordPress

Obviously you need a MailChimp account to get started. So if you don’t already have one, go ahead and register for a free account now.

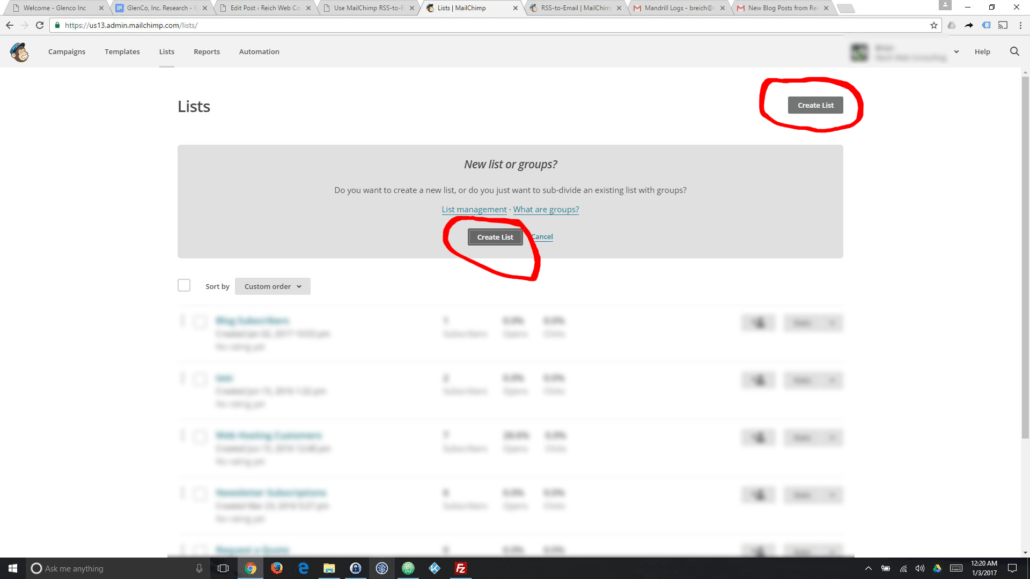
In order to setup MailChimp Blog Subscriptions, you first need to create a list to hold your blog subscribers. Read Create a New List to learn all about Lists on MailChimp and how to create them.

The Lists Management screen contains the Create List button which you will click to start a new list.

First, create a new list in MailChimp to store your blog subscribers

Create a MailChimp Form to Add Subscribers

Now that you’ve created your Blog  Subscribers list you need a way to for users to add themselves to the list. In other words you need a Blog Subscription form.  There are a number of ways you can do this.

You can of course manually code a form and the requisite client and server-side code to send submissions to MailChimp.  The code to do this is not complex, but it’s also well above the skill of the average non-technical WordPress user. But if you do go this route I applaud your efforts!

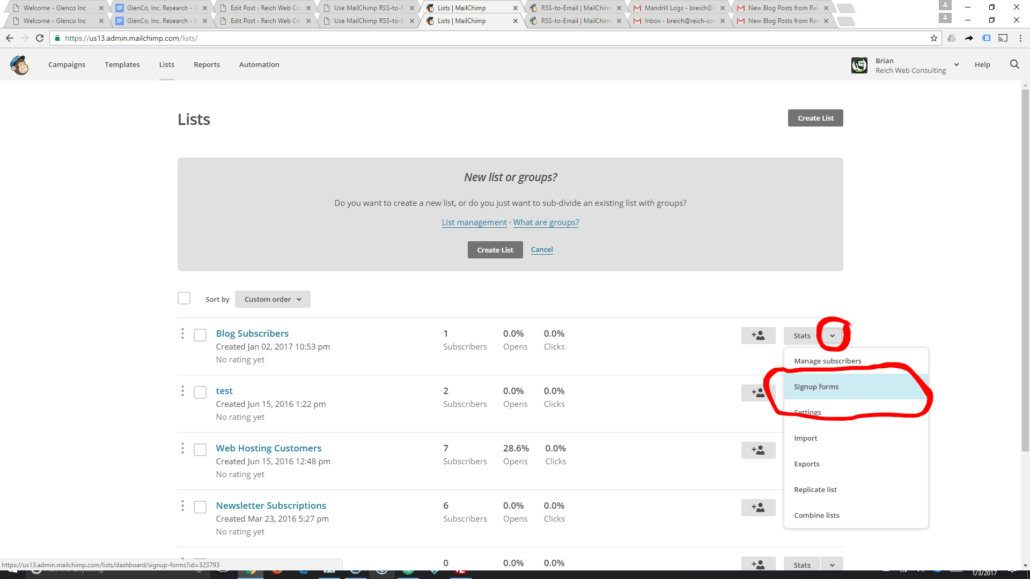
The second option is to use the sign-up form options provided by MailChimp. On your Lists Management screen you’ll see a drop-down menu to the right of each list, and under that menu you’ll see Sign-Up Forms.  The Sign-Up Forms option provides a variety of customizable forms that you can copy and paste into your website.

Finally, you can use a WordPress plugin like MailChimp for WordPress which will help you easily integrate your lists with your website. If you happen to be using Gravity Forms they have a terrific MailChimp add-on as well.

Use the MailChimp Signup Forms tool to create forms that you can easily embed in your site.

Use the MailChimp Signup Forms tool to create forms that you can easily embed in your site.

Setup an RSS-to-Email Campaign

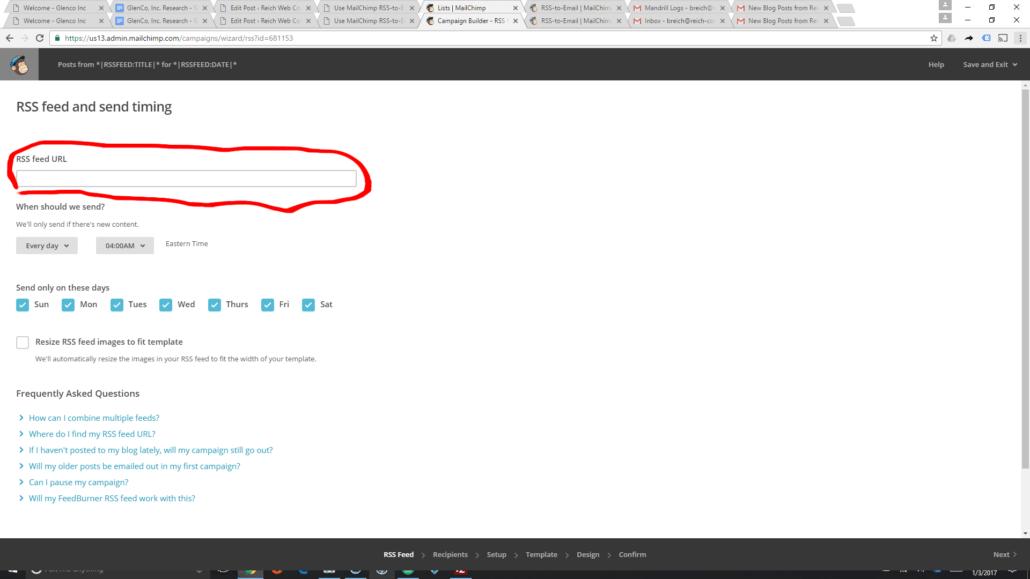
The final step required to get MailChimp to email your subscribers when you update your blog is to setup an RSS-to-Email Campaign. To setup an RSS-to-Email Campaign click the Campaigns tab, and then click the dropdown next to Create Campaign and choose RSS Campaign. Unless you’re using a plugin which overrides the default RSS feed for your site, your RSS feed URL should be http://yoursite.com/?feed=rss2 where http://yoursite.com is the site address you have configured in WordPress.

After you add your RSS feed address, you can configure a schedule for how often your RSS feed will be scanned for new posts.  Unlike JetPack Subscriptions, MailChimp cannot send out updates as soon as you update your blog, and this is probably it’s greatest failing at the moment.  However you can schedule daily, weekly, and even monthly emails.

Setting up the template for RSS-to-Email is just as easy as setting up any other mailing in MailChimp.  Simply drag the RSS Header and RSS Items widgets onto the template, and you’re ready to go.

After you've created your list and added a signup form to your site, create a MailChimp RSS-to-Email Campaign to tie it all together.

After you’ve created your list and added a signup form to your site, create a MailChimp RSS-to-Email Campaign to tie it all together.

Pros and Cons

The benefits of using MailChimp RSS-to-Email campaigns over Jetpack Subscriptions are obvious. You have full control over the process, what emails your subscribers receive, what they look like, and what they contain. On a recent project which used Jetpack Subscriptions, the client was very frustrated with the limited control we had over the emails being sent to her subscribers. This is actually the situation that led to me investigating MailChimp RSS-to-Email.

The cons are a little less obvious.  Jetpack Subscriptions have the benefit of being tied directly to your WordPress install. This means that Jetpack can do it’s thing as soon as you publish a new blog post.  Your MailChimp Campaign isn’t directly connected to WordPress. When you setup your campaign you tell MailChimp a time and a schedule at which it should check your RSS feed for updates.  MailChimp will generate and send your mailings only on the designated schedule and not on-demand.  If that’s a deal-breaker, then MailChimp RSS-to-Email may not be the solution for you.  However I would hope that they make this available in the future.


WordPress Logo

WordPress Scheduled Posts and Time Zones

I’m doing some work for a celebrity chef who has a ton of cooks in her kitchen. One of them is responsible for her blogging and social media strategy. She wants to queue a bunch of content that will be released on a slow, steady drip. The WordPress Scheduled Posts features is normally the perfect tool for this job.  Scheduled Posts didn’t work on her first attempt. Unfortunately the post she scheduled for New Years day remained in draft mode the morning of January 1. What went wrong?

How to fix WordPress Scheduled Posts by Setting your Time Zone

The answer is simple.  The developer that initially setup the client’s WordPress site left the time zone configured to UTC while the the client and her entire support team are on Eastern Time.  Solving the problem was as easy as setting the time zone in the WordPress General Settings screen by going to your Dashboard and selecting Settings > General from the main menu. Choose your time zone and then click Save Changes. WordPress lists time zones by UTC offset.  If you’re not sure of your offset, you can consult a helpful time zone chart here.

This image shows you how to fix WordPress Scheduled Posts by setting your time zone in WordPress

Follow the steps shown in thie image to set your time zone in WordPress.

How to Intregtate a Website with Zillow Using a Zillow Listing Feed

Update: Based on some recent experiences with Zillow, we’ve got a very different perspective now on what real estate and rental agents should participate in the Zillow Listing Feed program, and whether or not we’ll offer technical services to insist. Zillow has minimum size requirements that prohibit smaller companies from taking advantage of the feed program. Read the article to learn more. We’re leaving this article up because the technical details are still entirely accurate, if you’re large enough to take advantage of them.

Here at Reich Web Consulting, we’ve got more than a little experience working with real estate clients.  One of the most important factors in helping our customers succeed online is maximizing their visibility both on and off of their website. We must ensure that their rentals and for-sale properties appear correctly in real estate aggregation services like Zillow, Trulia, and Realtor.com, and the best way to do that is with a Zillow Listing Feed.

But integrating with Zillow can be daunting. It’s important to understand how Zillow works and approach your integration with realistic expectations.

This post imparts the knowledge I’ve accumulated through several Zillow integrations and will help you navigate the bumps you may encounter along the way.

Understand What Zillow is (and Isn’t)

I think Zillow did an excellent job of describing themselves:

Zillow is a media site – we display content and sell ads around the content. (Zillow FAQ)

Their goal is not to provide accurate property listings. Zillow aggregates real estate listings from a variety of sources, provides a user-friendly interface to search and review them, and profits by selling ad space around them. Zillow is a service that shows other people’s real estate listings. Zillow is not:

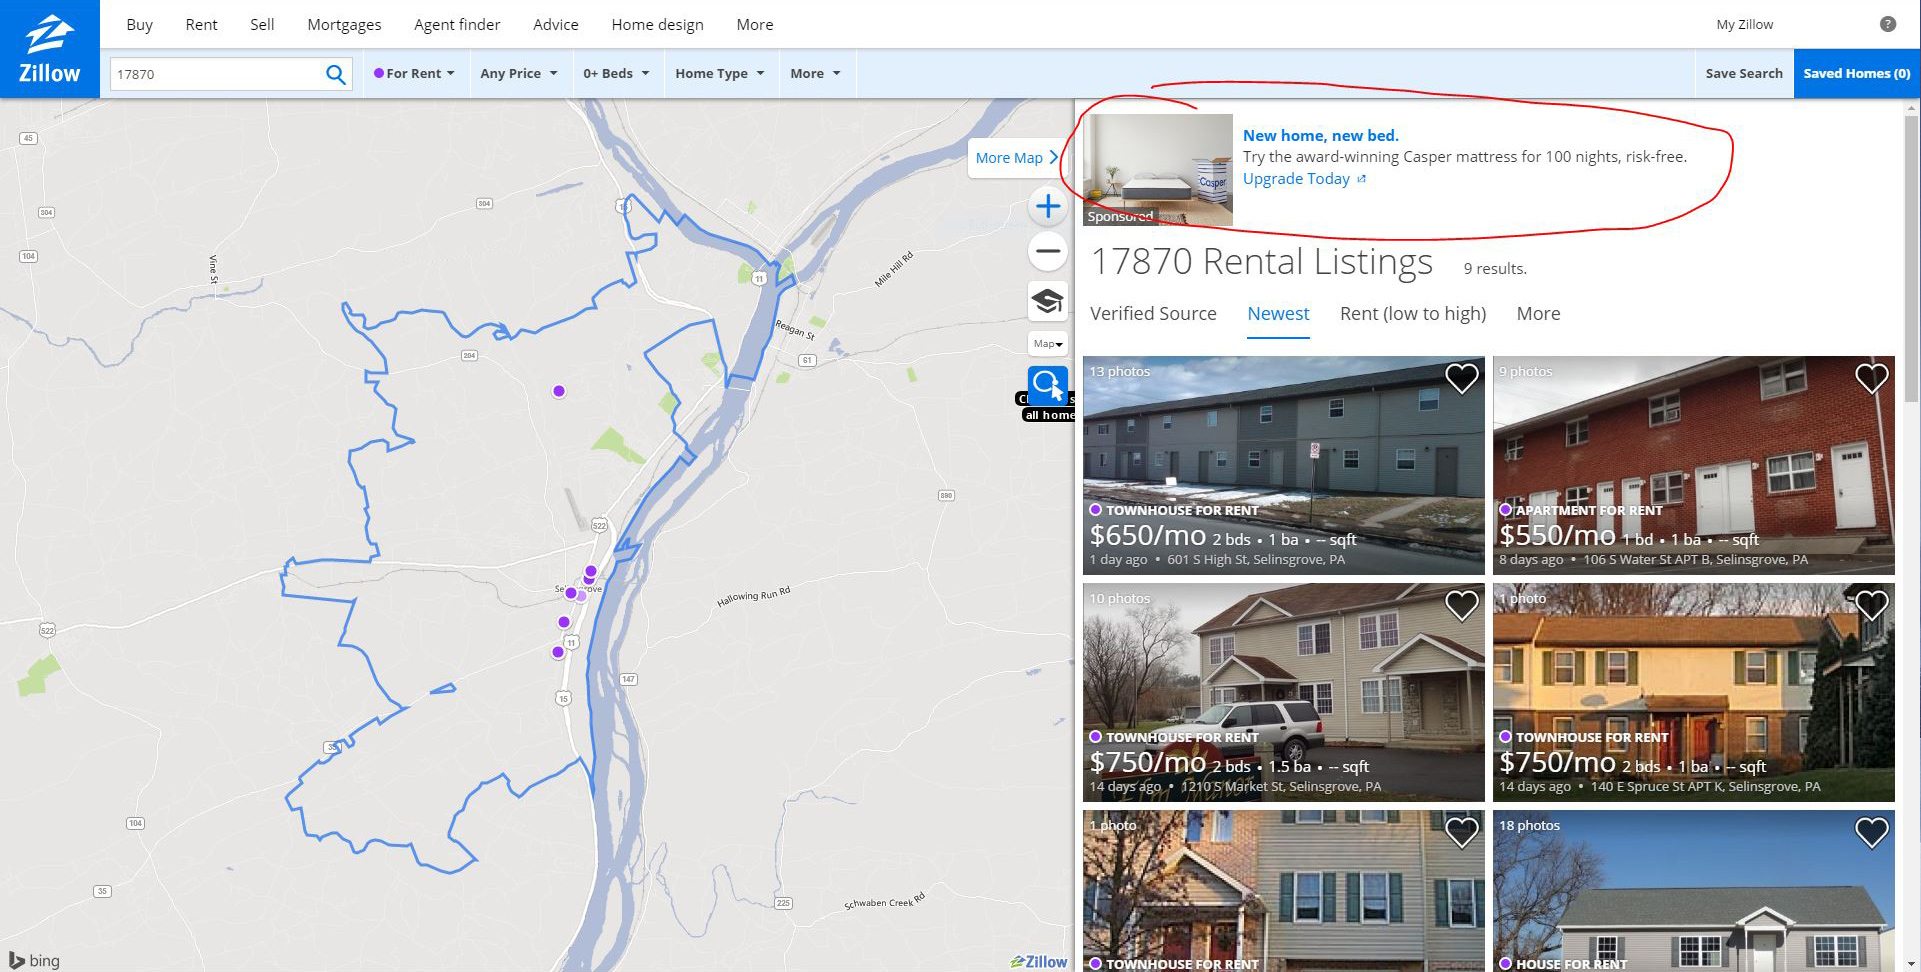
Zillow does not make money from real estate. Zillow makes money by selling ads on web pages that happen to contain real estate listings.

A Zillow search result screenshot with the ad space highlighted.

Zillow’s reason for being isn’t real estate. It’s ad space.

Zillow and other aggregators have an awkward relationship with the real estate industry.  Renters and buyers find the convenience of aggregators useful.  But agents and brokers find aggregators frustrating because they often appropriate their copyrighted material, list their properties without their permission, and often list incorrect or outdated information. Agents assert that  aggregators don’t really seem to care about listing accuracy, because their primary directive is to sell ads, not to provide accurate listings.

But the darned services are so useful that real estate customers just can’t help themselves.

While realtors generally despise aggregators, they’re also well aware that ignoring them is a monumental marketing misstep. Realtors embrace services like Zillow begrudgingly. This is understandable. Aggregators have largely usurped the realtor’s role in the home buying process.

If you’re a realtor, broker, or real estate company with properties to sell or rentals to fill, what’s your best course of action?  Embrace aggregators and take control of your listings. And the best way to do that with Zillow is to build a Zillow Listing Feed.

What is a Zillow Listing Feed?

A Zillow Listing Feed is an XML document that’s specifically coded to provide property listings to Zillow.  A Zillow Listing Feed:

  • Is an XML document that meets the Zillow Feed XML specification
  • Changes dynamically as listings’ details are updated
  • Is periodically downloaded by Zillow and checked for updates
  • Is checked for accuracy and combined with other data sources to build a Zillow listing

Businesses with only a handful of properties may find that managing their listings directly on Zillow meets their needs.  But realtors, brokers, and clients with large sale or rental portfolios will benefit from creating a Zillow Listing Feed.

Your Zillow listing feed should not be a static file: it should should be a dynamic document that changes as the status of your listing change.

A sample Zillow Listing Feed XML document.

A sample Zillow Listing Feed XML document.

How to Build a Zillow Listing Feed

Building a Zillow Listing Feed isn’t a job for a realtor.

Building a Zillow Listing Feed requires knowledge of your property management database which could be FlexMLS, your website’s content management system (such as a real estate plug-in for WordPress), or something else entirely. It also requires knowledge of a web programming language such as PHP that can read your database and translate your properties into the Zillow Feed XML format. This isn’t a process I can describe here, since how is dependent on where you store  your data.

You’ll want to hire a developer with the proper skills. If you don’t have such a developer, we’re kind of experts at this. Give Reich Web Consulting a call for a consultation and quote on your Zillow integration.

Once you’ve built your feed, you’ll submit it to Zillow. And then after that, all of your listings will appear in Zillow exactly as you’ve provided them in the feed. Right?

Not so much.

Zillow is quirky. Continue reading for a deeper understanding of what Zillow will do once it has access to your feed.

Approach Zillow Integration with Realistic Expectations

To the changrin of realtors everywhere, Zillow listing feeds and Zillow listings are rarely a perfect match.

If you decide to integrate with Zillow by building a Zillow Listing Feed you need to approach the project with a good understanding of Zillow’s process and a realistic expectation of how your feed will influence Zillow’s search results.

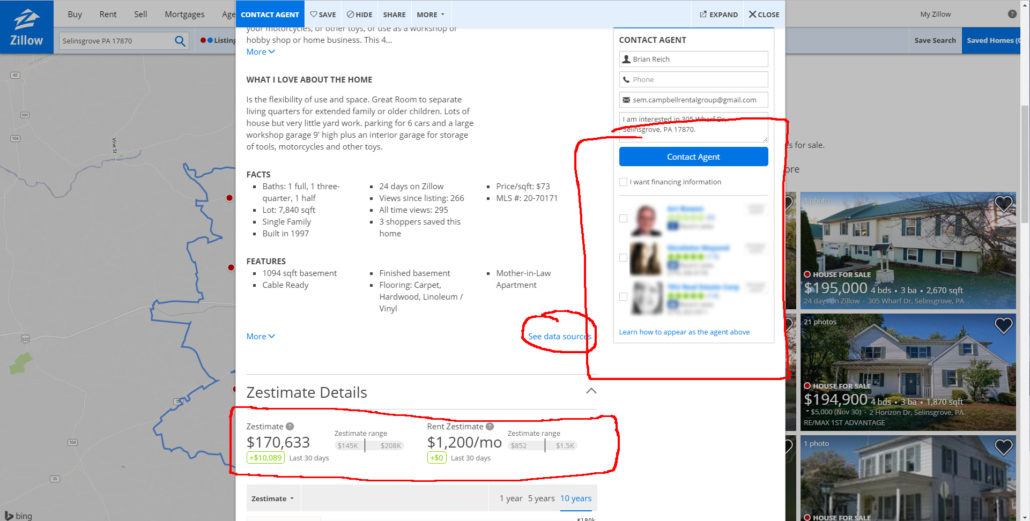
A Zillow listing with problem points highlighted.

Zillow listings are rarely prefect. Realtors get particularly upset when Zillow decides they’re not the realtor, or when the ZEstimate gives customers an inaccurate idea of the property value.

Zillow Builds Listings From Multiple Sources

Zillow aggregates real estate data from a variety of sources, only one of which is your Zillow Listing Feed.

Zillow’s process for building listings is similar to how Google builds their search index.  Google uses 200 signals to rank your content. Some you can influence directly, and some you can’t. Zillow is similar.  Zillow builds listings from multiple sources including manually entered data, Zillow Listing Feeds, and a variety of third-party data sources such as MLS (Multi-Listing Service) databases.  They verify sources and eventually combine them into the final listing.

How Zillow combines the data sources is not always obvious, accurate, or within your control.

Some data, like Zillow’s ZEstimate numbers, are controlled by complex algorithms and can’t be directly changed through your Zillow Listing Feed, or by updating a property directly on Zillow.

We use proprietary automated valuation models that apply advanced algorithms to analyze our data … to generate each home’s Zestimate. (What is Zestimate?)

Let your realtors know that not every detail of their Zillow listings can be changed and help them understand what can and cannot be influenced by their Zillow Listing Feed. Failing to set this expectation can leave realtors with the mistaken impression that incorrect listing data is always the fault of a broken feed (and the programmer that built it).

Zillow’s Approval Process

Zillow specifies that it can take 4-6 weeks to process and verify your feed.

Please allow a minimum of 4 to 6 weeks before the feed is activated. (Broker Feeds FAQ)

In other words: you’ll submit your feed to Zillow and it’s likely that you won’t see your data reflected in Zillow’s listings for a month or more. Don’t panic.  But do ensure that all agents with properties listed in the feed are aware of the time gap between feed submission and seeing the feed reflected in Zillow. Otherwise you’ll be hearing a lot of complaints that you’re powerless to resolve.

After your feed is verified and your listings appear in Zillow’s search results, your feed will be periodically checked for changes.

Zillow’s Refresh Rate

At one time the Zillow’s FAQ specified that feeds would be checked for updates every 24 hours. But that information is now conspicuously absent.

Zillow specifies that feeds must be updated at least every 24 hours in order to be accepted, which seems to indicate that they plan to check it for updates on a daily basis.

Since Zillow doesn’t explicitly state how often they’ll download your feed, I decided to see for myself how often my client’s feeds were being updated.

I downloaded the raw access logs for their website and filtered the records to display only requests for the feed URL, and only those accessed by a user agent called HotPadsFeedFetcher, the name of Zillow’s feed crawler.  On this particular client the feed was being accessed at least once every day by Zillow and often twice. Good news indeed.

But regardless of the results that I see in my server logs, experience tells me you should not expect Zillow to reflect the changes in your feeds very quickly. Here’s a post on Zillow’s community bulletin board that shows the confusion around Zillow’s update schedule. The consensus seems to be that there is no consensus.

I’ve seen Zillow take days to update listings based on my feeds.  I’ve also seen it ignore some feed updates completely.  We’ll talk about what to do when that happens momentarily.

Do Certain Data Sources Get Preferential Treatment?

According to Zillow’s Listing Feed FAQ, manual property listings will override data submitted in your Zillow Listing Feed.

No active listing data that is manually created and maintained will be accepted in a feed format. (Broker Feeds FAQ)

What this seems to indicate is that Zillow won’t accept feed data for properties that have been manually created by a realtor. Beyond that Zillow doesn’t seem to provide any guidance as to whether one data source is trusted more than another.  Experience indicates that it’s a case-by-case situation.

Can Realtors Manually Update Properties in the Feed Through Zillow?

Yes and no. Properties in a Zillow Listing Feed can and should specify the name and email address of the realtor listing the property. Once the feed data has been accepted, that realtor can log into Zillow using the email address specified in the feed and manually edit property details.

But unless listings are updated in your feed, they’ll revert back the next time Zillow downloads it. If you’re going to use a Listing Feed, consider it the primary source for your listings and have your realtors avoid making manual changes that they’re not also making in the feed’s data source.

If a realtor is antsy to change a Zillow listing they can manually adjust it by logging into Zillow.  But make sure the same change is made in the feed’s data source too. A listing from a feed with have manual updates overwritten when the feed refreshes.

My Feed is Right but my Zillow Listing is Wrong. How Can I Fix it?

You’ve paid a programmer to build your Zillow Listing Feed. You’ve submitted the feed to Zillow, and waited the 4-6 weeks indicated by Zillow’s FAQ. Your listings still aren’t showing up. Or they’re showing up with incorrect data. What do you do?

The first question to ask: is your feed technically sound?

An error in the XML feed format can throw off your listings pretty easily, and support should be able to tell you if your feed is wrong. Run your feed through an XML Validator to make sure it’s proper XML. If the feed passes XML validation, the next step is to make sure that it conforms to the Zillow’s feed specfication. Unfortunately Zillow only provides the spec in PDF format. They don’t provide a validator tool or even a Document Type Definition you could use to validate your feed. So open up your feed in a text editor.  Compare the structure, the tag names, and the tag content to what Zillow expects to see in the feed.  Some common errors are:

  • misspelled or improperly-cased tags (for example, <Prince> instead of <Price>, <listings> instead of <Listings>)
  • incorrectly nested tags (for example, putting <UtilitiesIncluded> inside <Listing> instead of inside <RentalDetails>)
  • specifying incorrect values for tags (for example, using true or false instead of Yes or No for Yes/No tags like <Water>)

Do your best to verify the XML before you submit your listing so technical details don’t prevent your listings from displaying beyond the default 4-6 week period.

My Feed is Technically Accurate But My Listings Stil Aren’t Updating/Are Wrong. What Now?

Get friendly with listingsupport@zillow.com.  

Getting support can be troublesome. Zillow isn’t in the accurate property listings business. They’re in the ad space business.  So at times it seems intentional that they don’t respond promptly to emails or provide a support phone number (though you can sometimes find it if you dig hard enough). That may be true.

So once someone responds back, get a name and direct contact information for that individual, and a phone number if possible, and do your best to make them the point person for your feed. During my first Zillow integration it was incredibly difficult to contact support. But once I did I worked with a woman named Rachel, who over time was able to answer our questions and solve our problems. Shout out to Rachel! I’m not sure if she’s still at Zillow, but at a company who had a poor customer service culture, she was a beacon of light.

Even after you fix any technical glitches you’ll still find that listings have old and inaccurate data.  I’ve made dozens of calls and emails to Zillow to resolve these problems only to be told our feed is correct, it just takes time to verify and update the information.

So How Close is Close Enough?

It’s up to you to decide how correct your listings need to be.  I have some customers that are happy with the instant boost they receive from simply submitting to Zillow. I have other customers that demand perfection in their Zillow listings. Working with support to fix listing data is time-consuming.  If my code causes a listing mistake I fix my code for free. I always charge for my time when Zillow is at fault for listing errors.  It’s then up to the client to decide if it’s worth that expense to resolve.

A Tale of Two Feeds

I’d like to part with a story of two Zillow Listing Feed integrations. One was a huge success. The other was a slow, frustrating, loss for all involved.

My First Zillow Integration

A sales team spearheaded my first Zillow integration. Unfortunately they lacked the information necessary to set client expectations before the integration began.

The project turned into a tumultuous relationship between my employer, the brokerage, their realtors, and Zillow.  The brokerage hired us to redesign their website. As part of the redesign, my agency had agreed to build out the brokerage’s Zillow feed based on the listing data stored in the website.  The sales team didn’t understand Zillow’s 4-6 week time gap, their approval process, or how they build their listings. So through an error of omission, the sales team set expectations the web development team were powerless to meet.

What followed were several difficult months. The client had daily complaints from their realtors about incorrect Zillow listings. They responded with complaints to our sales team. The sales team did the only thing they knew to do, which was to make the development team investigate errors that weren’t errors at all, but a gap in the time it takes Zillow to refresh a feed, verify data, and update their listings. You can waste hours of time waiting for Zillow to say “it’s you. It’s me.”

The realtors lost faith in their brokerage. The brokerage lost faith in us. And we lost faith in Zillow. All because the integration began with unrealistic expectations.

A Recent Zillow Integration

My most recent Zillow integration was the opposite experience.  The client was new to Zillow, but I sold them on its value based on past experience.  I explained the issues with verification time, Zillow’s process, and listing accuracy prior to approval. My client approved the project will an understanding of the results they could expect.

The end results?  I’ve never had to follow-up with this client about incorrect listings.  They’re happy with the exposure that Zillow provided, and that the metaphorical No Vacancy sign still shines bright.

These two projects were technically very similar. But setting expectations made all the difference in the success of the project and the happiness of the client.

Summary

As you can see, integrating your real estate or rental website with Zillow can be a frustrating task.  But it doesn’t have to be.  Follow the suggestions that I’ve provided.  Ensure that your feed is technically correct before submitting it to Zillow.  Be patient. Don’t expect perfection from every Zillow listing.  And by all means, approach the project with appropriate expectations.  Start your Zillow integration with realistic expectations. Understand that a properly-built feed will offer your listings to millions of visitors through Zillow, Trulia, and Yahoo! Real Estate, but Zillow’s process may prevent the details from ever reaching perfection.