WordPress Pages and the WordPress Page Editor
In my last article I talked about WordPress Posts, one of the two primary content types in WordPress. In this article I’d like to talk about WordPress pages.
What’s a WordPress Page?
WordPress Pages are your blog’s primary content. That’s not to say that they’re more important than your blog posts, but rather that they support your posts and are available wherever a user might find themselves on your site. To quote WordPress.com,
Pages live outside of the normal blog chronology, and are often used to present timeless information about yourself or your site — information that is always applicable.
Another way of looking at WordPress pages is that they are the items that appear on your primary navigation.
If you want to use WordPress to build a static website (just a few pages that rarely change, as opposed to a blog with dynamic, changing content) you can do this with WordPress pages. Simply create your pages and configure WordPress to use one of them as the front page.
What Content Should I Put in my WordPress Pages?
Pages can contain just about anything you care to put on them, but there are some classic examples.
A page might offer background on you or your company (“About Me”). It might display an email form and phone and mailing address information (“Contact Us”). It could display an outline of your site that helps your visitors find the content they’re interested in on your site (“Site map”). If you’re WordPress site provides e-commerce you’ll probably have a “Shop” page, or if you’re site focuses on a retail product you might have a “Store Locator.”
Creating and Editing WordPress Pages
If you want to create a new page, log into your WordPress Dashboard and click Add New under the Pages heading on the Dashboard menu. If you want to edit an existing page just find the page by clicking on the All Pages link under the Pages heading.
The Page editor looks like the Post editor with a few exceptions. Let’s talk about each item in some detail below.
The Page Title
The page title is the name of the page. It will appear as the link text in your navigation, the title that appears at the top of the user’s web browser, and the heading that appears above the page content in most WordPress themes. Give some thought to your page title, as you probably won’t want to change it often. If you’re editing a page that appears on most websites such as About Us or Contact Us, don’t get too cute. Visitors get accustomed to finding information under certain headings, and using different language may make finding it confusing.
If you’re concerned about search engine optimization, use a plug-in like WordPress SEO by Yoast to help you choose keywords and include them in your title.
The Page URL
The page URL appears just below the page title. The bulk of the URL is automatically generated using your site’s permalink structure, but you can edit the part of the URL specific to the page, called the page slug. By default your page’s slug is automatically generated when you create the title.
The Page Content
This is where you will actually design your page and add text, images, videos, and just about anything else to its body. The editor functions in Visual and HTML mode. Visual Mode provides the following features:
- Upload and insert images and other media.
- Font styles such as bold, italic, and strike-through.
- Lists (orders as well as unordered).
- Text alignment (left, right, centered)
- Creating hyperlinks both within and outside of your WordPress site.
- Spell-check
- Page breaks
- HTML hierarchies and formats including headers (h1 through h6 tags), block quotes, and addresses. Utilize these features as much as possible to break your article into logical components.
HTML mode is for folks who know HTML and want more control over their content. Just remember that you can switch modes at any time, but if you author a page in HTML mode and switch to graphical mode to make some edits, be ready for the editor to break your carefully crafted HTML markup!
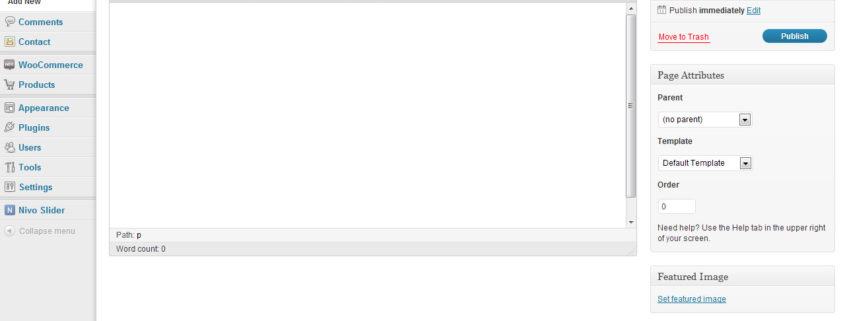
Publish Options
The Publish box, or meta-box in WordPress terms, lets you control who, if anyone, can view the page. Clicking the Publish button saves your page and any settings that you’ve changed. If your page is already published, the Publish button will say Update instead. Before you publish your page you will also have the Save Draft option which allows you to save your post without making it publicly available on your site. For example I’ve saved this page as a draft 5 times already because I needed to stop writing and return to finish it later.
The Status option provides three options:
- Draft – Your page is in the editing process and won’t be displayed on your public site.
- Pending Review – Similar to draft mode. A post pending review requires an administrator to check and publish it.
- Published – Your page is complete and is visible on your public site.
- Scheduled – Similar to Published, but your post is not visible until a specific date.
The Page Visibility option provides several options as well:
- Public – Public visibility (the default) means that anyone browsing your WordPress site can view the page.
- Password Protected – WordPress prompts visitors for a password to view the page.
- Private – Only authenticated users (like admin or other users you have creates within WordPress) will be able to view the page.
You can read more about page visibility at the WordPress support site.
The Publish option allows you to choose to publish the page immediately or at a specific date and time. This is useful if you would like to author a page ahead of time that isn’t visible until a specific date, such as a page about a fundraiser that begins on a specific date.
Page Attributes
By default the Page Attributes meta-box allows you to set the parent page, template, and order for the page that you’re editing.
The Parent Page option allows you to organize your pages into a hierarchy. If you begin to accumulate a lot of pages, you’ll soon notice that they break your top-level navigation, or at the very least make it look ugly! At this point you’ll want to consider grouping your pages into a hierarchy, in which similar pages are grouped together.
For the sake of argument let’s say your site has the following pages: About Us, Contact Us, Our Staff, Shop, Directions, and Sitemap. Making About Us the parent page for Contact Us, Our Staff, and Directions makes sense because these pages provide additional information about you or your company. Sitemap and Shop do not. In addition, they’re important enough that you would want them to be top-level navigation items anyway.
The Template option allows you to change the layout for a particular page, however the template options available are completely dependant on your theme. Many themes provide one, two, and three-column templates or templates designed for a specific function such as highlighting an image or a video.
The Order option allows you to customize where in your navigation menus this page will appear. A value of 0 is the default. A lower value will place a page closer to the beginning of your menu, whereas a higher value will place the page closer to the end. A tie between pages with the same order is broken by the alphabetical order of their titles.
Featureds Image
The Featured Image option is theme-specific. That is, support for this option must be built into the active WordPress theme in order for this option to be visible on the Page editor. This option allows you to upload an image to WordPress and assign it to the post. How it displays on your site is completely up to the theme.