This category contains pages for all of my custom WordPress Plugins.

Creating a WordPress Plugin, Part 1: Naming Your Plug-in

[amazon_enhanced asin=”0470916222″ /]

The first and arguably most important step in creating a WordPress Plugin is choosing a name for it. If you plan to share your plug-in with others it should obviously be catchy, but more importantly it should also be unique for two very good reasons explained below.

Make Your Plugin Stand Out

WordPress has a vast number of free and commercial plugins available. If you choose to share your plug-in with others you’ll want your plug-in to stand out from the rest. Before you decide on a name for your plug-in, use Google and the WordPress Plugin Directory to do some research. Rather than call our recipe plug-in that we’ll be creating simply Recipes, we’re going to call it Delicious Recipes, by Reich Web Consulting.

Namespacing

Regardless of whether or not you choose to share your plugin with others, when you begin coding you’ll have to make decisions about naming things like functions, classes, constants, and other identifiers.  Identifiers must be unique not just within your plugin but to PHP, WordPress, your active theme, and any other active plug-ins.  Defining two identifiers with the same name will result in a namespace collision: an error condition in which two or more identifiers have the same name.  Lets say we’ve written the following PHP code:

// Intentially cause a namespace collision: 
function printf( $args ) { 
    // Function definition
}

Because the printf() function already exists in PHP, the following error is generated:

An example of a PHP namespace collision error.

Using the PHP and WordPress documentation you can safely avoid namespace collisions with PHP and WordPress, but how do you avoid colliding with the thousands of other plugins and themes that you and others might install alongside of your own? The answer is to namespace your plugin code. 

How do you namespace your plug-ins?  It’s as simple as choosing a prefix that’s presumably unique to your plug-in and appending it to all global identifiers. The name of my company is Reich Web Consulting and the plug-in we will be developing is for managing recipes, so I’m going to choose RC_Recipes as my namespace:

<!--?php /*  * Define a namespaced class.  */ class RC_Recipe_Plugin {      // Class code } /*   * Define a namespaced function.    */ function rc_recipe_plugin_function( $args ) {      // function code  } /*   * Define a namespaced constant.   */ define( 'RC_RECIPE_CONST', 0 ); ?-->

If you’re experienced with PHP you might be wondering why we don’t solve the problem of namespacing by using PHP’s built-in namespace feature. The reason it’s not used is because, at of the time this tutorial was written, WordPress requires version 5.2.4 of PHP, which does not support namespaces. While you could still write your plug-in using PHP namespaces you would be seriously limiting the number of people that could use it by requiring a version of PHP newer than that which WordPress itself requires.

Summary

Before you go all gung-ho slinging code it pays to takes a few minutes to consider the design and marketing implications of naming your plugin.  Choose something unique but catchy, and use your plug-in name to create a unique namespace for your code.   In the next part of this tutorial we’ll be creating the directory and file structure for out plugin.  Catch you then!

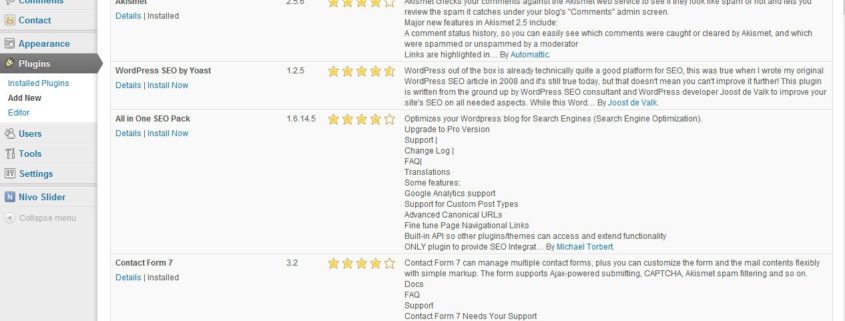
This image shows a list of some of the most popular Wordpress plugins.

Installing WordPress Plugins

[youtube_sc url=”http://www.youtube.com/watch?v=scvMMLXsFD8″]

In my last post I talked about  installing WordPress themes. Themes help you quickly change the look and feel of your website.  But what if your site needs a feature that isn’t built into WordPress?  Well today we’re going to learn how to add features to our blogs by installing WordPress plugins.

What the Heck is a Plugin?

This image shows a list of some of the most popular WordPress plugins.

Some of the most popular WordPress plugins help you improve your SEO and add interactivity to your blog.

A plug-in is a WordPress module that adds features to or otherwise enhances your blog.  They can do literally anything that a clever programmer can think up. Installing WordPress plugins can make it simple to publish maps, display attractive image sliders, provide e-commerce features, and even increase your search engine visibility.

Like themes, plug-ins come in two flavors: free and premium.  Most free plug-ins are available on the official WordPress Plug-in Directory. Like themes, you shouldn’t use free plug-ins that come from other sources. Plugins in the Directory have been vetted by the WordPress community and are usually updated frequently.

Finding a Plug-in

There are thousands of free plug-ins available in the WordPress Plug-in Directory.  You can search the directory through the website or through the WordPress Dashboard:

  1. Log into your WordPress Dashboard
  2. Under the Plug-ins menu click Add New.
  3. On the Install Plugins page you can search for plug-ins by keyword, or you can use the Featured, Popular, and Newest.

Don’t forget: there are also premium (paid) plug-ins available from a variety of companies such as Woothemes.  When I first started using WordPress I had an aversion to paid plug-ins.  Why should I pay to add one simple feature to a system that’s already free?

That mentality changed when I started using WordPress professionally. Sometimes installing WordPress plugins from the WordPress Plugin Directory won’t provide exactly what you’re looking for. (I’m looking at you, Every Free Slider Plug-in Out There)Sometimes times it’s faster to pay for a feature rather than to build it yourself or work with a half-baked plugin. In these situations don’t be afraid to go premium.  I use numerous premium plug-ins including Nivo Slider and payment gateway extensions to Woocommerce.

Installing WordPress Plugins

There are two methods for installing WordPress plugins. The first is to search for the plugin through the Install Plugins screen and clicking install. The second is by uploading the plugin and then activating it.

Installing WordPress Plugins through the Install Plugins Screen

Installing WordPress plugins through the Install Plugins screen is the simplest way to install plugins from the WordPress Plugin Directory.  Search for the plugin through the Install Plugins screen then click install.

  1. Log into your WordPress Dashboard.
  2. On the Dashboard menu click Add New under the Plugins menu.
  3. Search for a plugin.  You can do this by typing in a plugin name or a keyword into the search field and clicking Search Plugins, or by exploring the Featured, Popular, and Newest links, or by clicking any of the tags in the Popular Tags area.
  4. Once you have located the plugin you would like to install click Install NowDepending on the configuration of your website, you may be prompted for your FTP username and password.  Enter them if prompted.
  5. After the plugin is finished installing, you can make it active by clicking Activate Plugin.

Installing WordPress Plugins by Uploading through the Install Plugins Screen

Installing WordPress Plugins by uploading through the Install Plugins screen is the simplest way to install plugins from outside the WordPress Plug-in Directory. These steps assume that you’ve already downloaded the ZIP file containing the plugin.

  1. Log into your WordPress Dashboard.
  2. On the Dashboard menu click Add New under the Plugins menu.
  3. Click the Upload link.
  4. Click Choose file and select the ZIP file containing the plugin. Click Install NowDepending on the configuration of your website, you may be prompted for your FTP username and password.  Enter them if prompted.
  5. After the plugin is finished installing, you can make it active by clicking Activate Plugin.

Uploading Plug-ins via FTP

  1. FTP to your WordPress site and navigate to wp-content/plugins/.
  2. Extract the ZIP file containing your plugin.  It should contain a single directory named after the plugin.
  3. Upload that directory to wp-content/plugins/. 
  4. Log into your WordPress Dashboard.
  5. Click Plugins on the Dashboard menu.
  6. Locate the plugin you just uploaded and click Activate.

Post Install Configuration

After installing WordPress plugins many will require some sort of configuration after you activate them.  For example the Akizmet spam filter plugin requires that you enter an API key (a code that identifies your account with them).  Most plugins will provide a notification at the top of your dashboard that they require configuration.

Summary

Plugins do for your blog’s function what themes do for it’s form.  They can make your blog more than just a blog, and few WordPress sites ever reach their full potential without at least a couple of key plugins.  Remember: only install plugins from the WordPress Plugin Directory and from reputable developers of premium plugins.  Once you locate a plugin you’d like to use on your blog you can install it directly through the Dashboard or by uploading it via FTP, but you’ll still have to activate the plugin in the Dashboard once you finish.

Thanks for reading! In my next couple of posts we’ll cover how to add content to your blog in the form of posts, pages, media, and links.

Choosing a WordPress Backup Plugin

One of the first things you should do after installing a new WordPress blog is configure backups. Though WordPress does feature an export feature that allows you to save much of your content to XML, there isn’t a full-blown backup feature built into the WordPress Core. You’ll need to download a WordPress backup plugin.

Features to Look For in a WordPress Backup PlugIn

These are the minimum features that I look for in a backup plug-in.  You may have different requirements than my own but if your backup plug-in doesn’t provide these features, you will eventually find it lacking.

  • Backs up the entire database, not just the core WordPress tables. In the event that your site crashes and needs to be restored, you’re going to need a backup of your database.  The last thing you want is to restore your database and find that plug-in content such as purchase records in a shopping cart plugin or images stored in a gallery plug-in no longer exist.
  • Backup the entire WordPress Directory. Some backup plug-ins only backup the database, but there is plenty of content that’s stored on the filesystem and not the database including uploaded media, plugins, and theme customizations. Choose a plugin that backs up the entire file system for your blog. That way when a crisis occurs, you can simply dump the files and database back to the server and continue business as usual.
  • Scheduling. Your backup plug-in should provide some sort of scheduling feature that can automatically perform backups as a daily, weekly, or monthly task. You shouldn’t have to remember to manually backup you blog, though a manual backup feature is helpful as well.
  • “Off-Site” Backup.Your backup plug-in should have some way of saving your backup off site. It could be by emailing them to you, uploading them to an FTP site: anything that duplicates your blog data to a second server in case your server is physically damaged. A plug-in that simply saves the backup to the same server that hosts your blog doesn’t protect you from the all-to-common hard drive failure, your hosting company going belly-up, or any other scenario that prevents you from getting access to  your data.

Backing Up WordPress to DropBox

I use DropBox to store business records and other important files, and so I’ve settled into using the WordPress Backup to DropBox plugin for most of my sites.  The plug-in provides all of the features that I mentioned above.  In addition it gives me access to those backups from my PC via the DropBox desktop application, and gives me confidences that my backups are occurring when I scheduled them because I can see the files updating in real-time.

Another excellent and popular plugin is Backup Scheduler. It allows you to specify what gets backed up (database, files, or everything), and has the option to send you the backup via email.

What To Do When Wpautop Attacks Your Markup

Professional WordPress Plugin DevelopmentThere are fewer things more annoying about the WordPress platform than watching your carefully-crafted markup go straight to Hell.  If you’ve used WordPress for more than 10 minutes you probably know what I’m talking about.

The primary culprit is a filter called wpautop that automatically applies to post and page content. The wpautop filter converts double line breaks to sets of opening and closing paragraph tags.  It works fine if your posts are text only, contain no images, no short codes, and only the most basic inline markup.  Throw a few block-level elements into a post or a shortcode or two, however, and watch your markup devolve into a tangled mess of improperly-nested tags.

How To Tell If Wpautop Is Causing Problems

You can usually tell if wpautop is causing HTML validation to fail if the W3C Validator is giving you the errors:

document type does not allow element "xxx" here

followed by

end tag for "xxx" omitted, but OMITTAG NO was specified

Seeing this combination of errors, particularly when the tag in question is a <p> tag, is a pretty good indication that wpautop is to blame.

Solutions

The following are a few common solutions for living with, or without, wpautop in WordPress.

Turn it Off

If you are comfortable with HTML markup you may be better-served by just disabling wpautop completely and specifying all of your own HTML markup when writing blog posts. You can disable wpautop either by installing a plug-in that does it for you (this one for example), or by adding the following lines to your theme’s functions.php file:

remove_filter( 'the_content', 'wpautop' );
remove_filter( 'the_excerpt', 'wpautop' );

Use wpauto-control

I like to use the wpautop-control plugin, which allows you to set wpautop to enabled or disabled by default, then switch it on or off on a post-by-post (or page-by-page) basis. This allows me to develop complex pages with wpautop disabled, but leave it enabled for simpler blog content created later by my clients.